CreditSoft can call external web services and process the returned data.
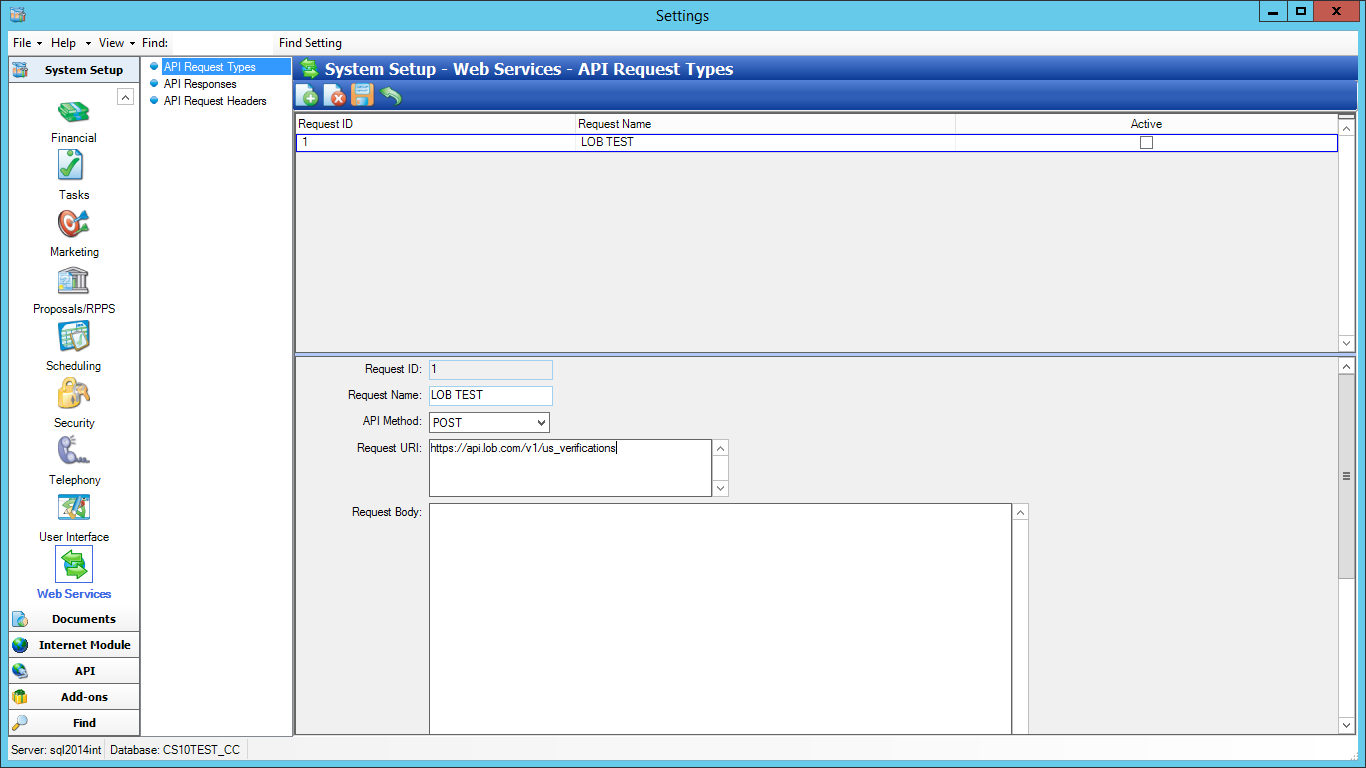
In Settings, under the System Setup group, find Web Services at the end of the group items.
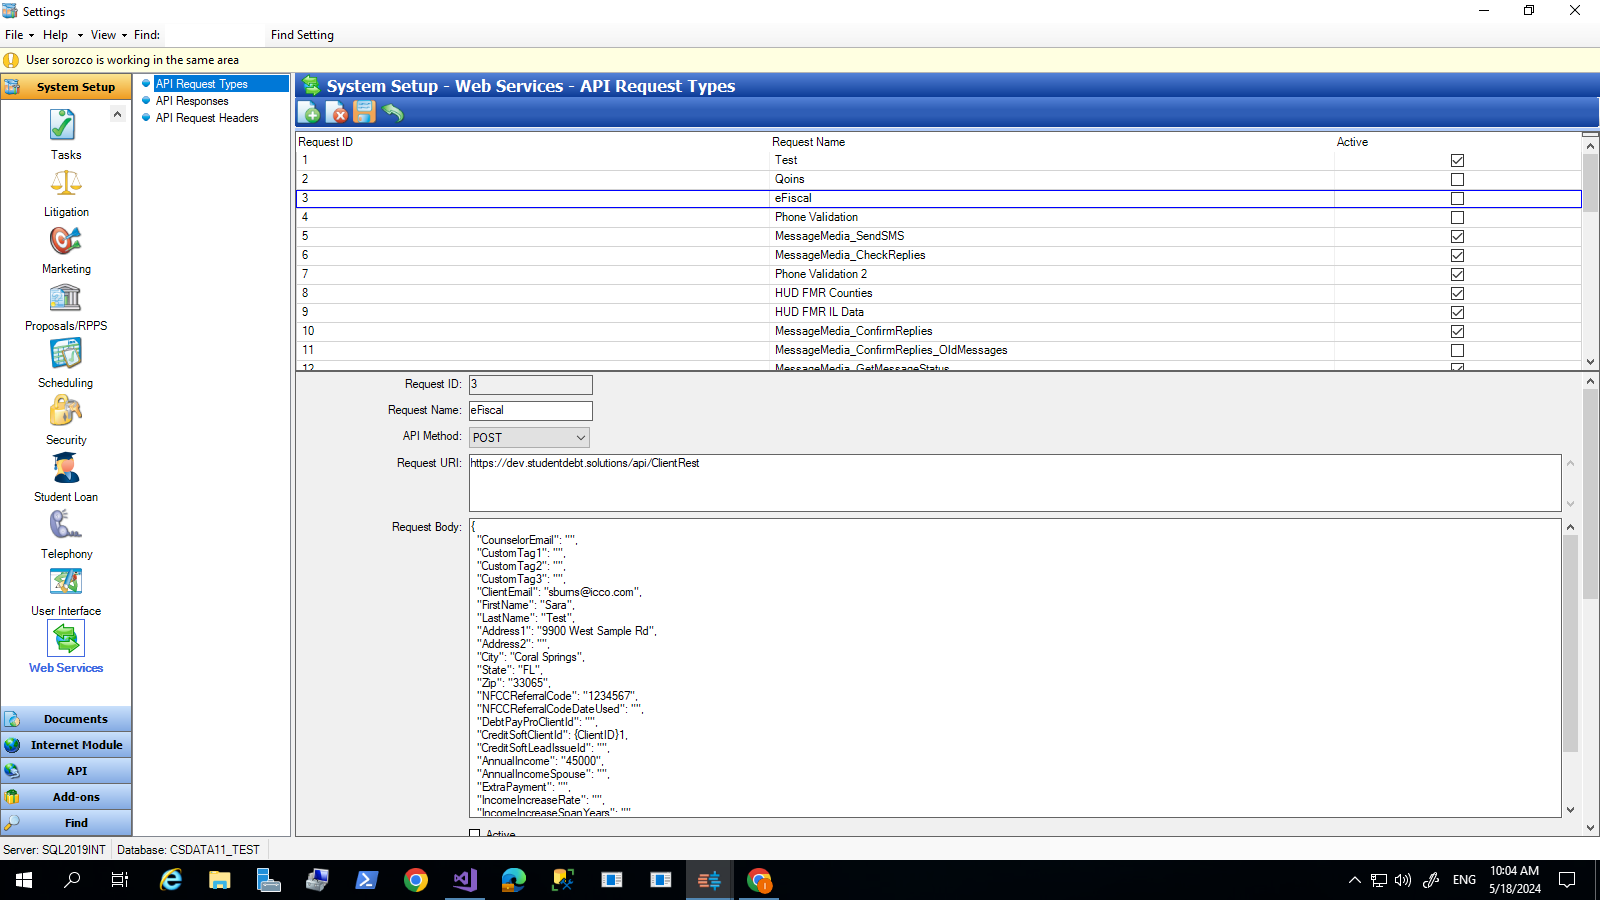
Click on API Request Types
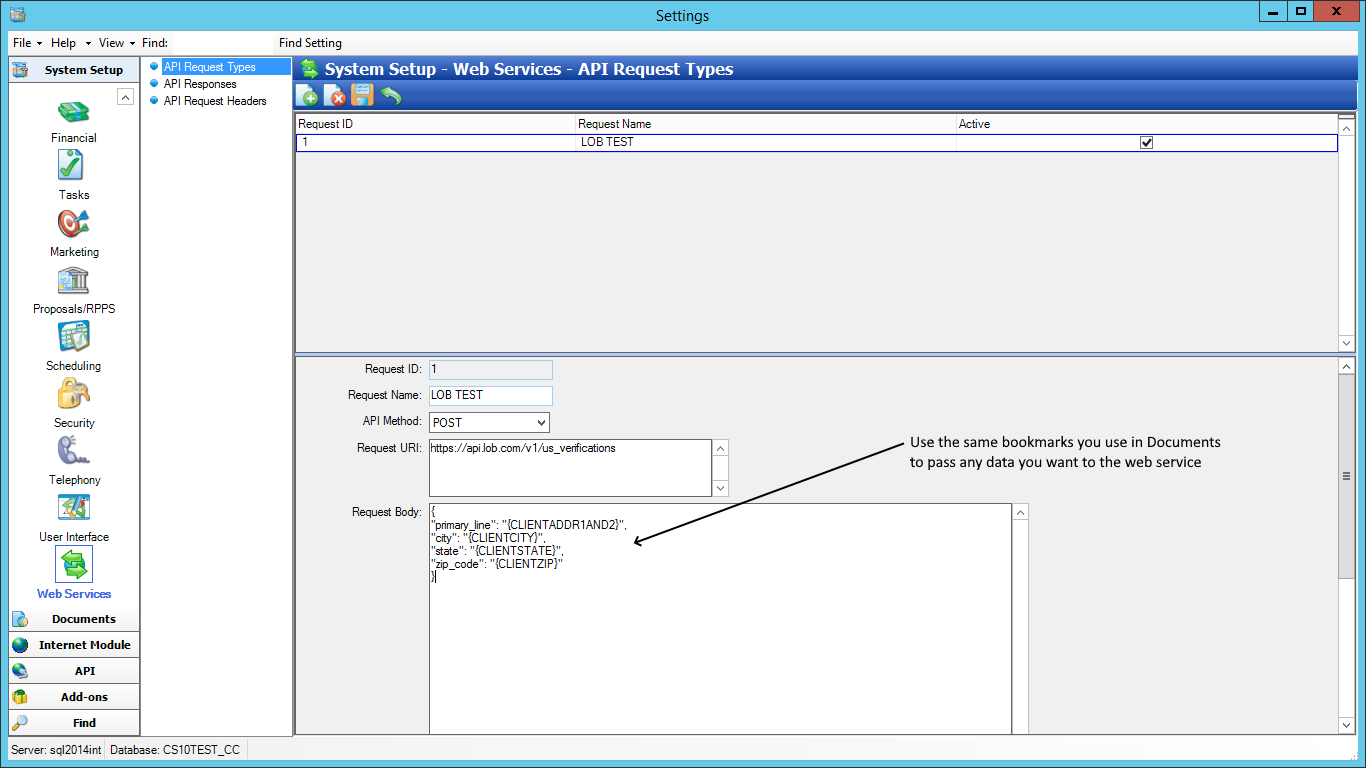
A 3rd-party API Request has the following parameters:
A unique number assigned by the system when you add a new API Request Type. You will use this number to call a specific API Request when using the command APIRequest for example.
Enter a name that will identify the request.
POST or GET
The URL of the request. Typically you will only enter the URL without parameters (as you can enter the parameters on the next box Request Body)
The body (aka content) of the HTTPClient request. The next field will define what type of content you are sending. The body is typically a JSON object for most REST API calls.
Allows you to easily activate or deactivate the call without having to delete it and readd it. Check the box to be able to use the API call.
Typically one of the following:
application/json
multipart/form-data
You can define a SQL script to run after the request has completed successfully.
You can use the APIResponseID bookmark {APIResponseID} which will point to the record in the APIResponse table that contains the response from the API Request.
WEB: Do not use any other bookmark on the Post Script when this API Request is used on the web portal. The {APIResponseID} should be the only one you need in order to process any action, since the entire response is on that table.
If your Post Script SQL returns a row with the column called OutputText, then the content of that column will be displayed in a message box after the call executes.
For example:
The below will call a scalar function passing it the APIResponseID and will display the result from the scalar function to the user that is calling the API.
select dbo.CUSTOM_ParseeFiscalResponse({APIResponseID}) as OutputText
If your Post Script SQL returns a row with a column called OutputCommand, the content of that column will be executed as a command.
For example:
Open a custom DQ form after the API call executes:
select '[Command:GoToURL|~/DynamicData/DQForm.aspx?EQS=000E6ADB841B60051412DFB9C785BB88020000003557E4ABA89B11B25FA33C4FC30E3C41C34F992C4136A0B2124693CEBB6DED21E3FF17EE0F7FB1C79EE4E66E028FEEE06B8A3263C09902E37EF7660EA959BB9E31BAD5914F16675B830189E5E3C55819|0]' as outputcommand
For simple API calls that return a simple JSON response, you can choose to parse the response using a Regex expression.
Any text you capture as regex capture groups in the regex expression can be then used as bookmarks in the Post Script
For example:
Let's say the API response will be a JSON object that contains the "Valid" a "LineType" elements. In that case you could use the following regex to retrieve those values.
(?i)(?:"valid":(?<valid>[a-zA-Z0-9_ ]+),)|(?:"carrier":"(?<carrier>[a-zA-Z0-9_ ()]+)",)
Then you can use the bookmarks {valid} and {carrier} in your Post Script which will be replaced with the text captured in the regex groups you defined in the expression.
For example, a SQL Post Script that uses those captured values could be something like this:
select case when '{valid}' ='false' then 'Invalid Phone' else 'Valid Phone from: ' + '{carrier}' end as OutputText
The timeout in seconds to wait for the 3rd party API to return a response. For requests that may take a long time please set the API Timeout to override the default of 100 seconds.
The timeout in seconds to wait for the Post Script SQL to execute. For parsing scripts that run SQL and have a long processing time please set the SQL TImeout to override the default of 30 seconds.
The number of seconds to wait between repeated calls to this API. Can be used to prevents requests from running mutiple times.
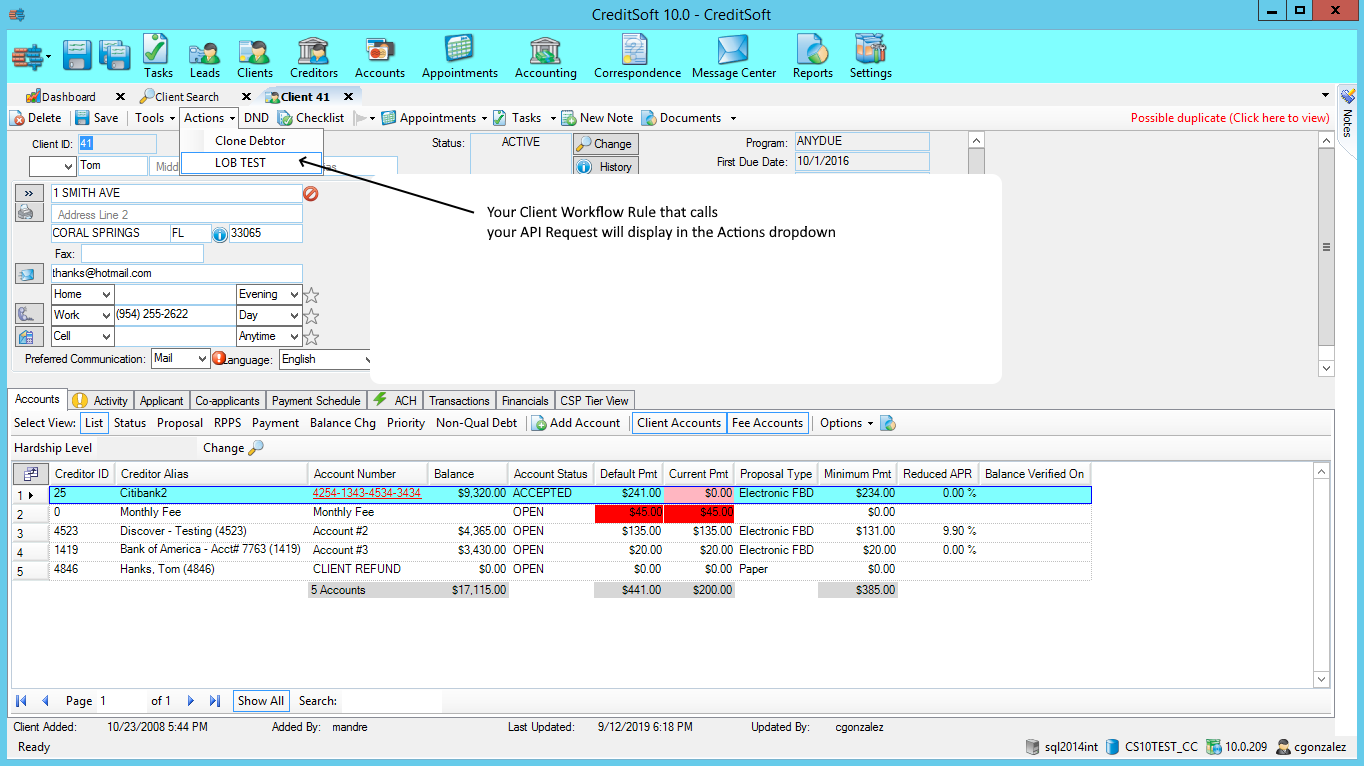
You can call the API by defining an on-demand workflow rule and using the command APIRequest
Any button in a Custom Form can call one of the API calls you have defined by using the command APIRequest
Let’s look at how we could call a web service to validate a client’s address.
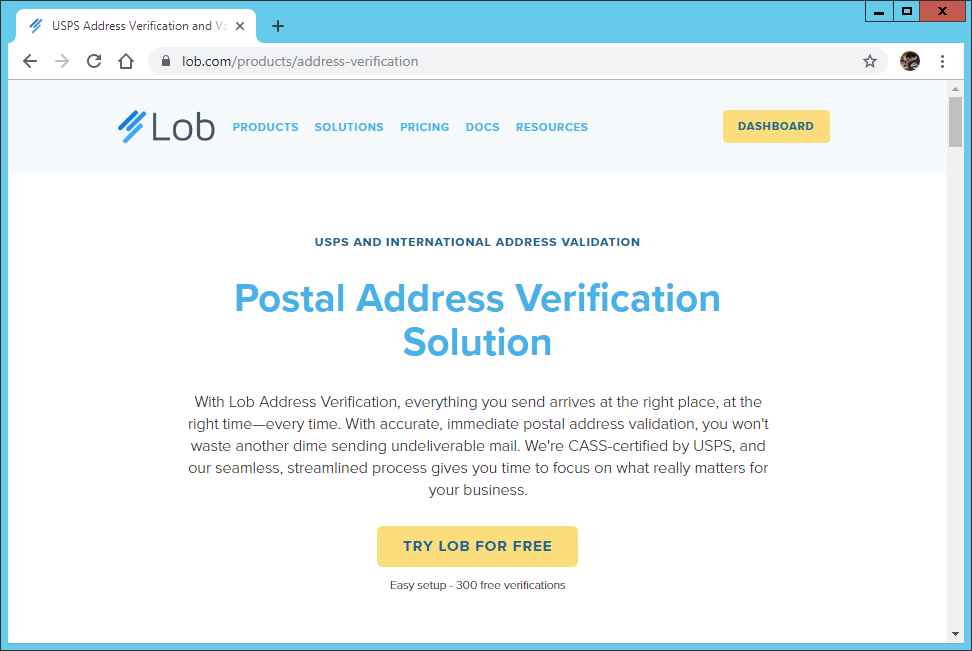
Create an account with Lob.
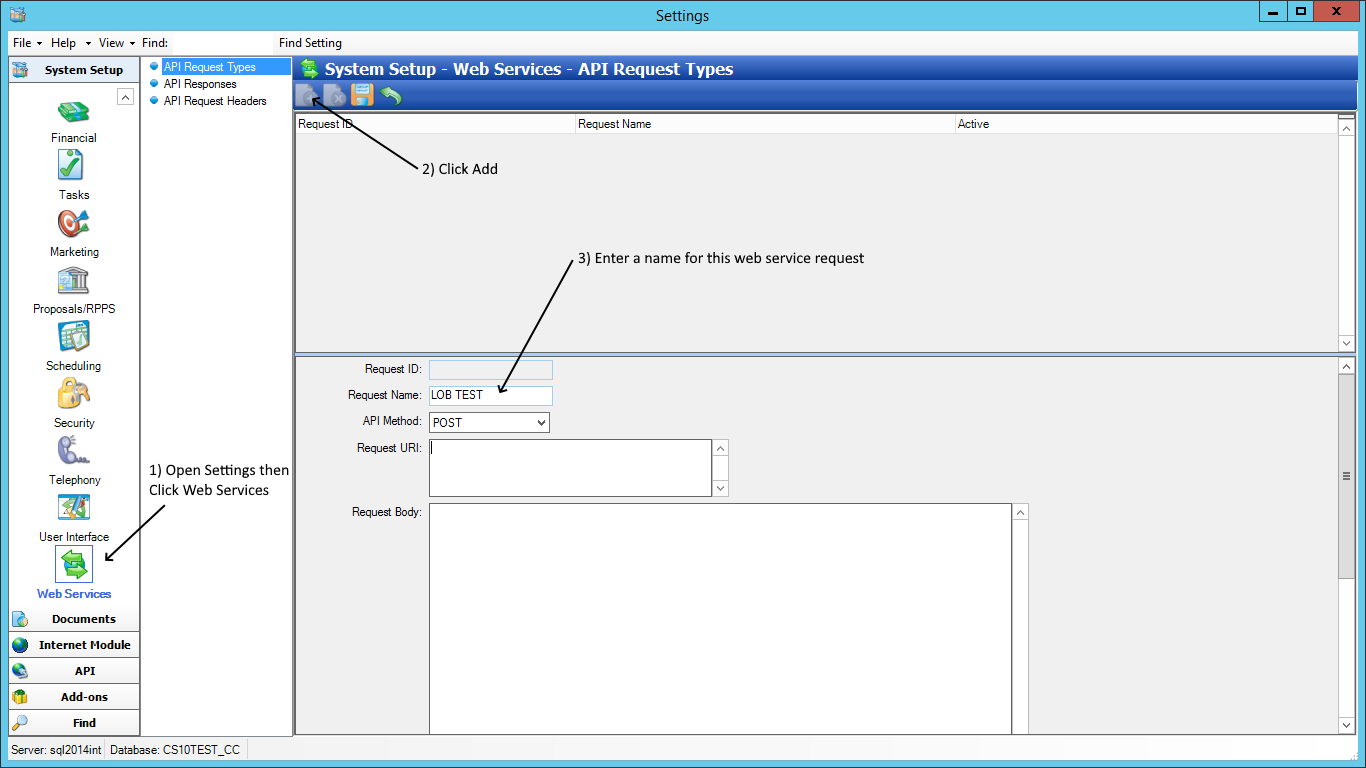
Notice that after the Request Name (which is the name you give to this request), it asks for the API Method and Request URI. Let’s go back to the documentation on the Lob website.
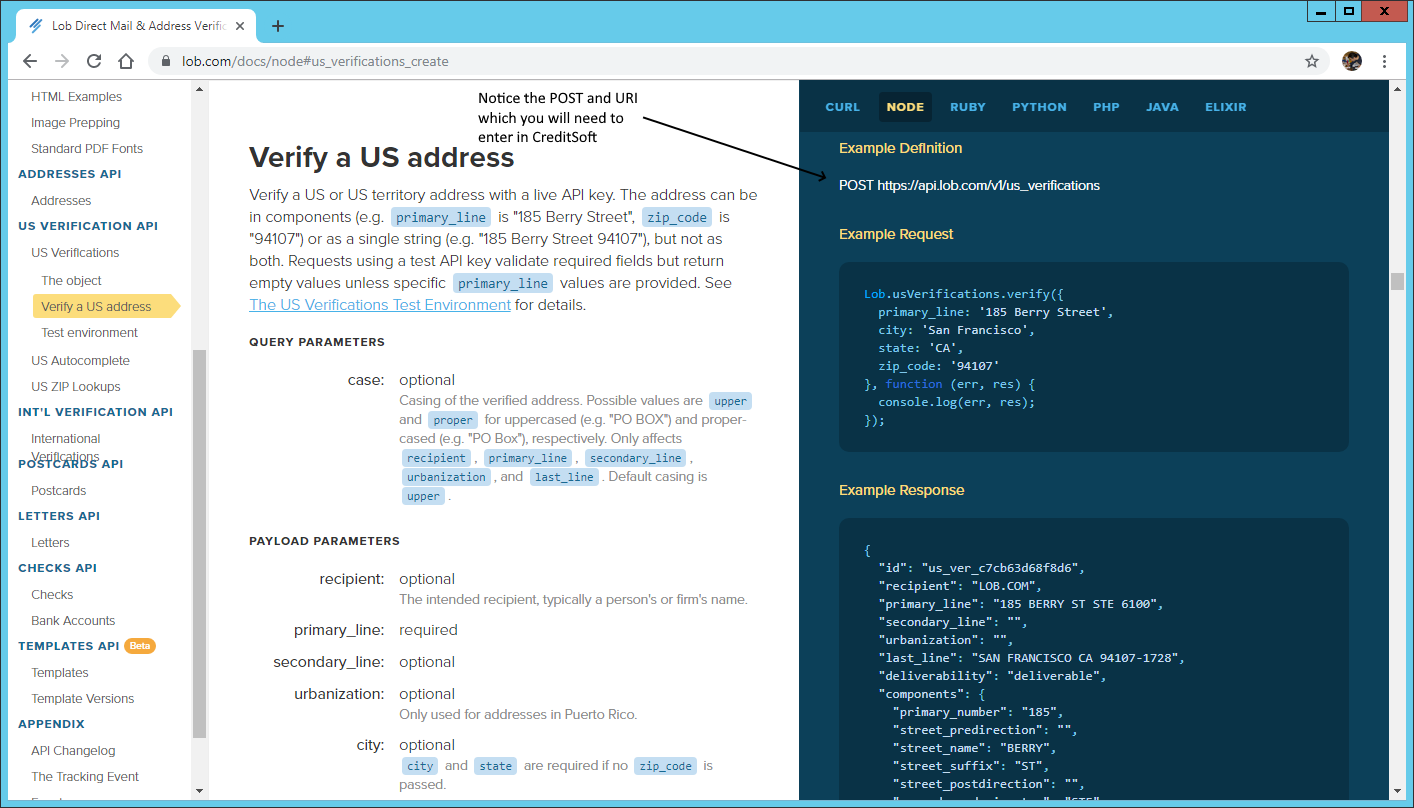
To verify a US address with Lob the request has a method type of POST, and the URI is https://api.lob.com/v1/us_verifications. Enter that in CreditSoft.
Next is the Request Body. This will describe the data that what we are sending Lob. Let’s use their test data for now. Notice their example request has the following fields:
primary_line: '185 Berry Street',
city: 'San Francisco',
state: 'CA',
zip_code: '94107'
We need to send those in a JSON format, which is the standard for REST, which looks like this:
{
"primary_line": "185 Berry Street",
"city": "San Francisco",
"state": "CA",
"zip_code": "94107"
}
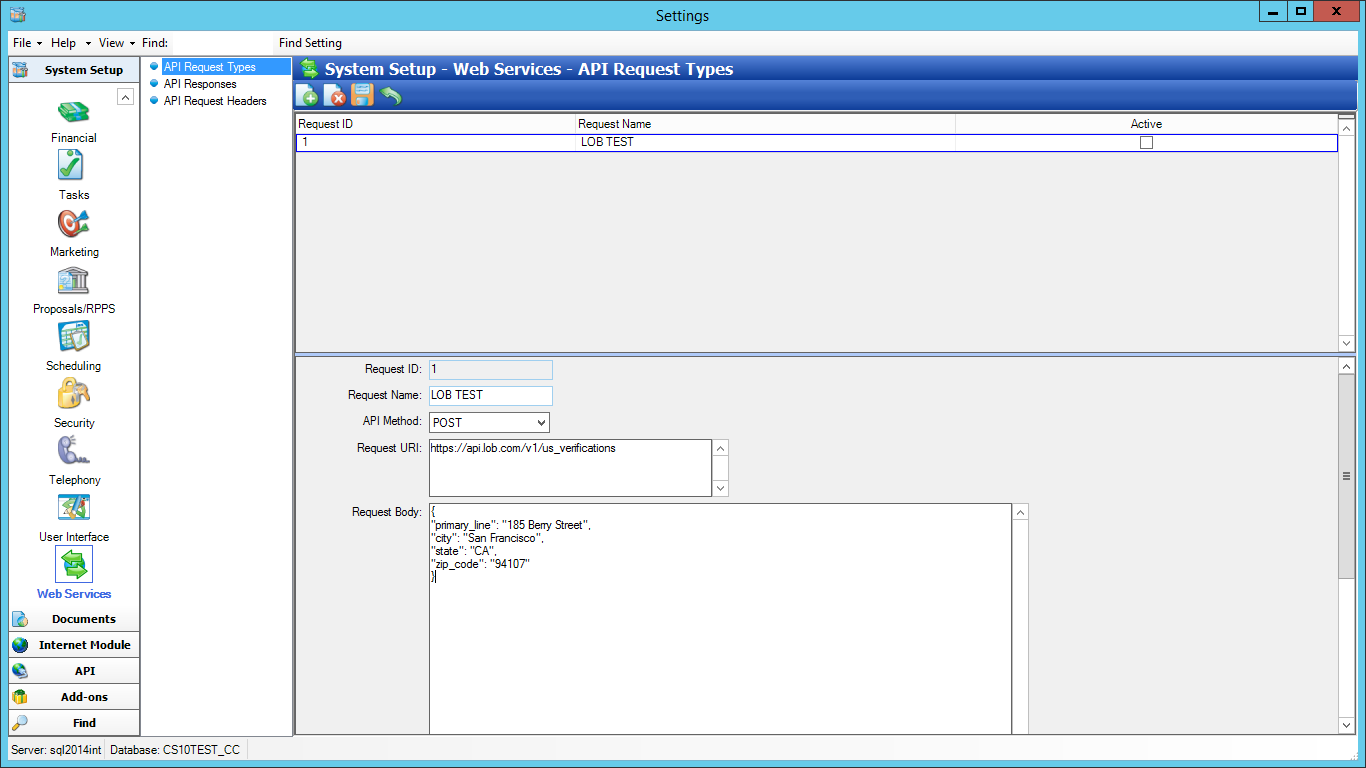
Scroll down and click the Active checkbox to enable this request.
Leave the Content Type as application/json since that is the standard and the one Lob uses.
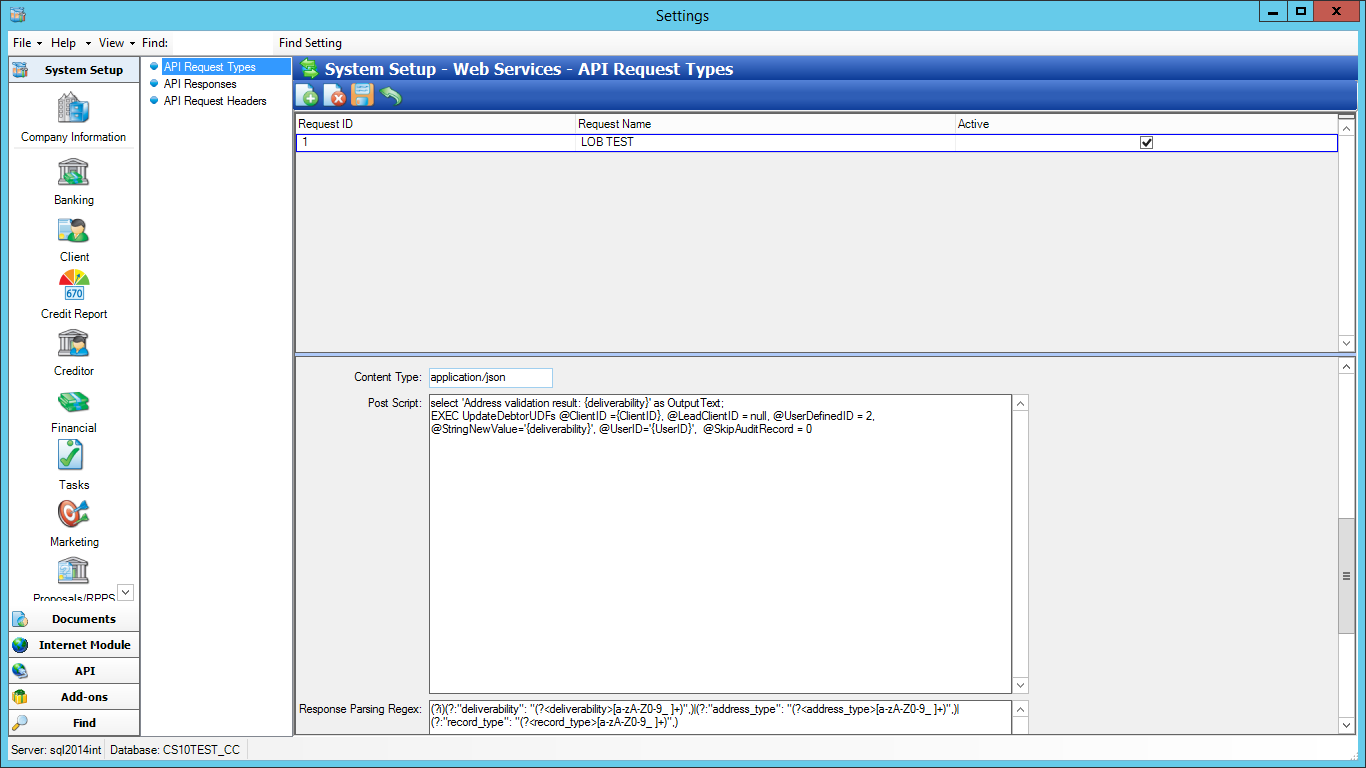
Save the Request and take a note of the Request ID number (1 in the screenshot above)
Open the documentation on their API. Notice that they use Authentication which almost all APIs use, so they know who is using their services. Lob uses HTTP Basic Authentication.
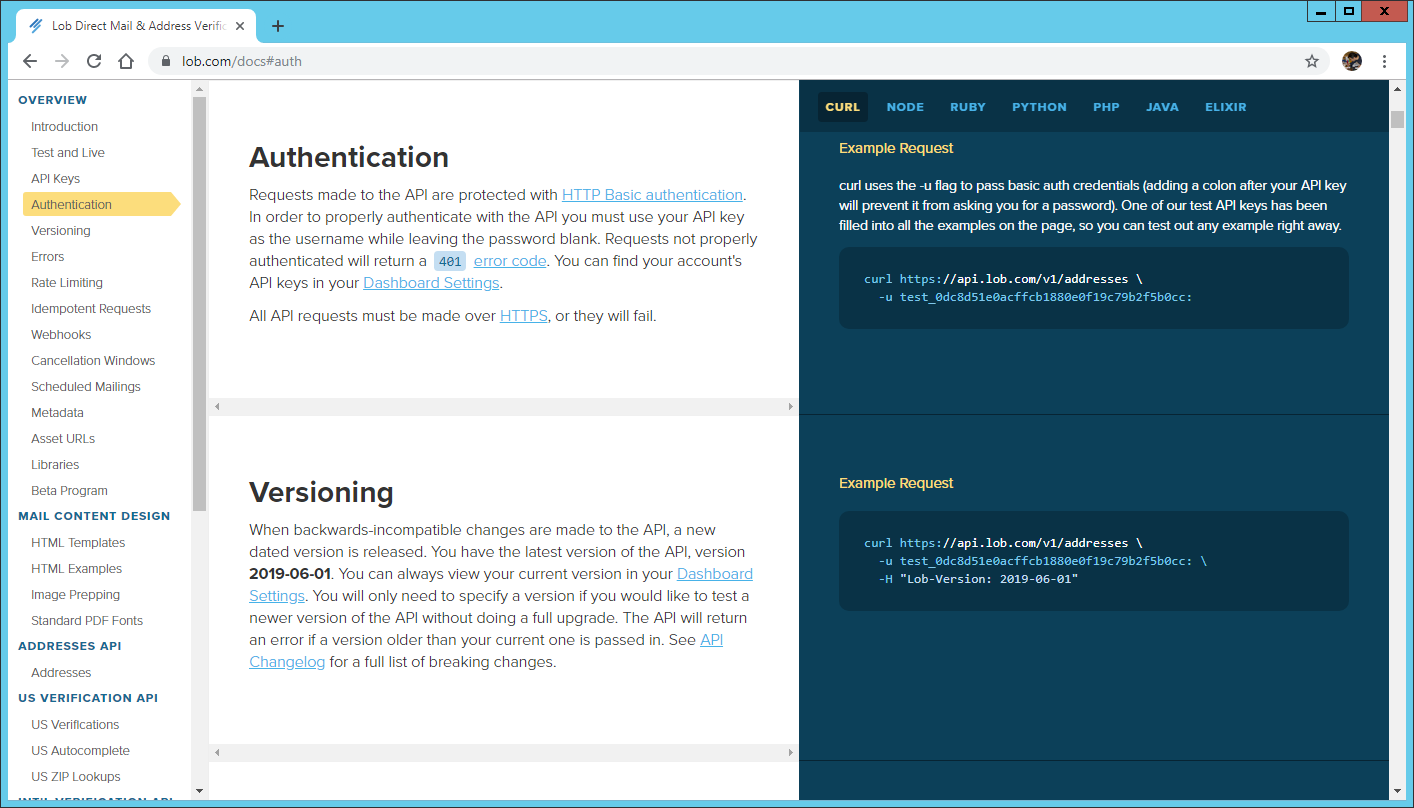
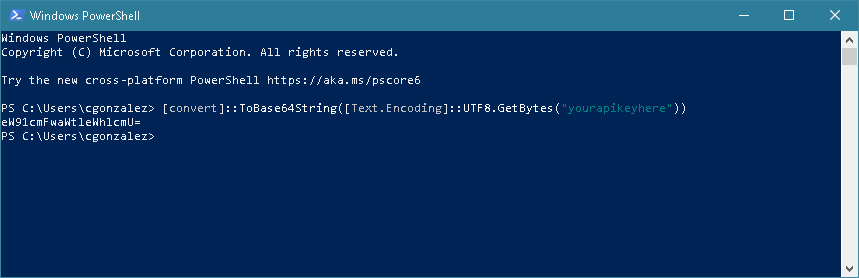
For Basic HTTP Authentication, you will need to Base64 Encode your API key. This can be done in Windows Powershell using the command:
[convert]::ToBase64String([Text.Encoding]::UTF8.GetBytes("yourapikeyhere"))
IMPORTANT NOTE: Lob instructs us to use the Live Published key for this call. Also, Lob asks that you add a colon : after the API key. Make sure you do that when calling the command below.
Copy the result of the command including the = sign at the end
We will need to define a Request Header in CreditSoft for our Lob Request
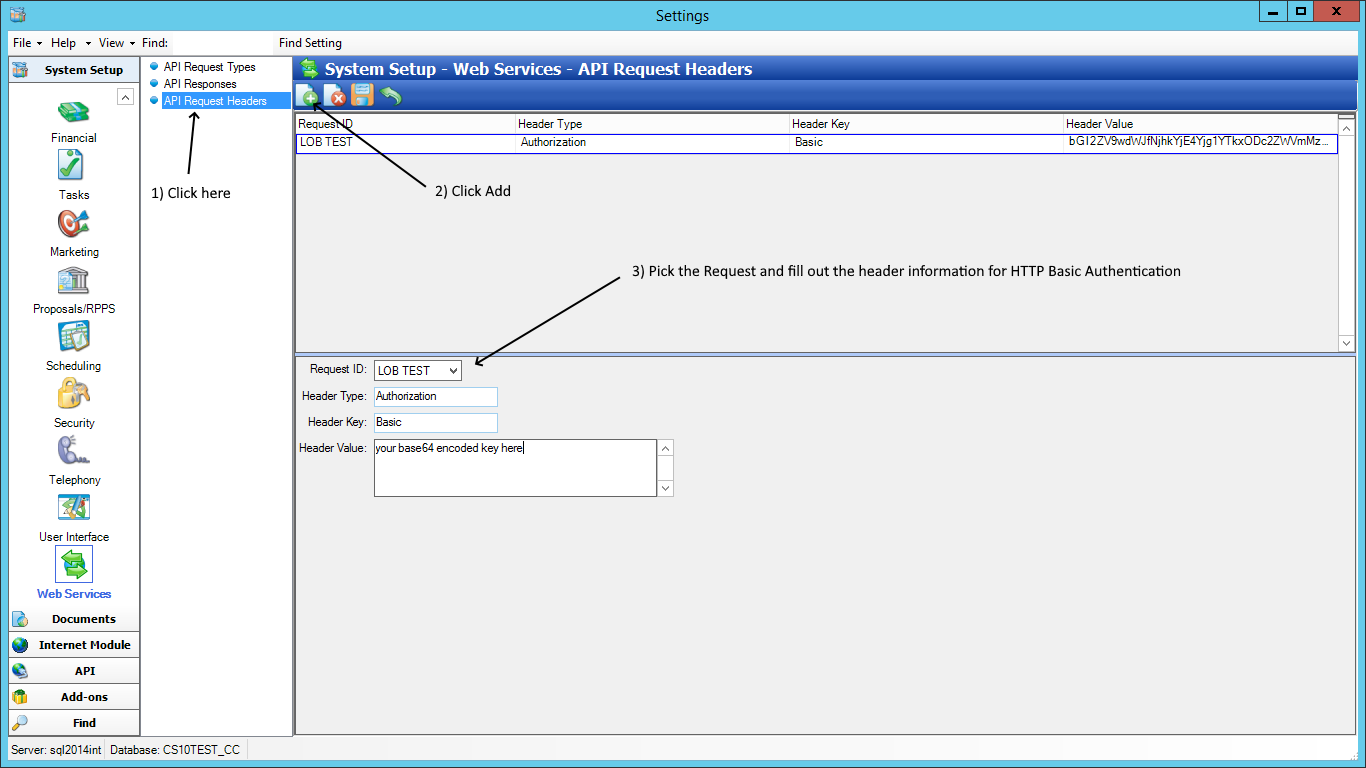
Choose the Request, and fill out the header information:
Header Type: Authorization
Header Key: Basic
Header Value: The Base64 encoded API key
Save the Request Header.
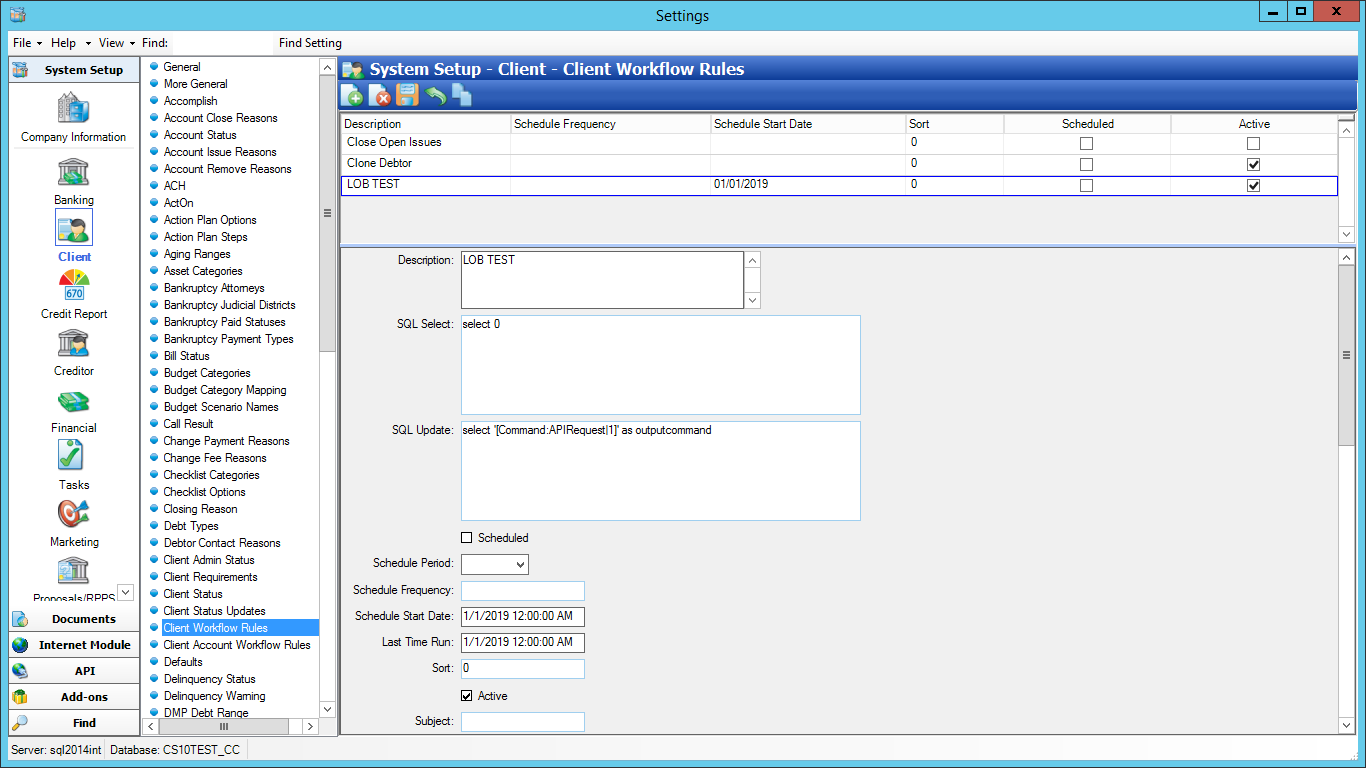
In Settings, navigate to Client Workflow Rules and add a new rule. Enter the name you want to show on the menu item under Description.
Then type the following in the fields:
SQL Select: select 0
This will make the menu item available for every client
SQL Update: select '[Command:APIRequest|APIRequestID]' as outputcommand
Replace APIRequestID with the Request ID number of the Request you created. In our example the request had the number 1, so the SQL Update would be:
select '[Command:APIRequest|1]' as outputcommand
This syntax lets CreditSoft know that you want to execute an API Request when you click this workflow rule on the Client screen.
Enter a bogus date in the Schedule Start Date and Last Time Run fields (1/1/2019 for example)
Check the Active checkbox
Save the Workflow Rule
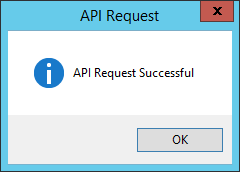
Close Settings and let’s test our API call
If everything was configured properly you would get the following message box
You might get an error. For example, if you entered a wrong key you might get this:

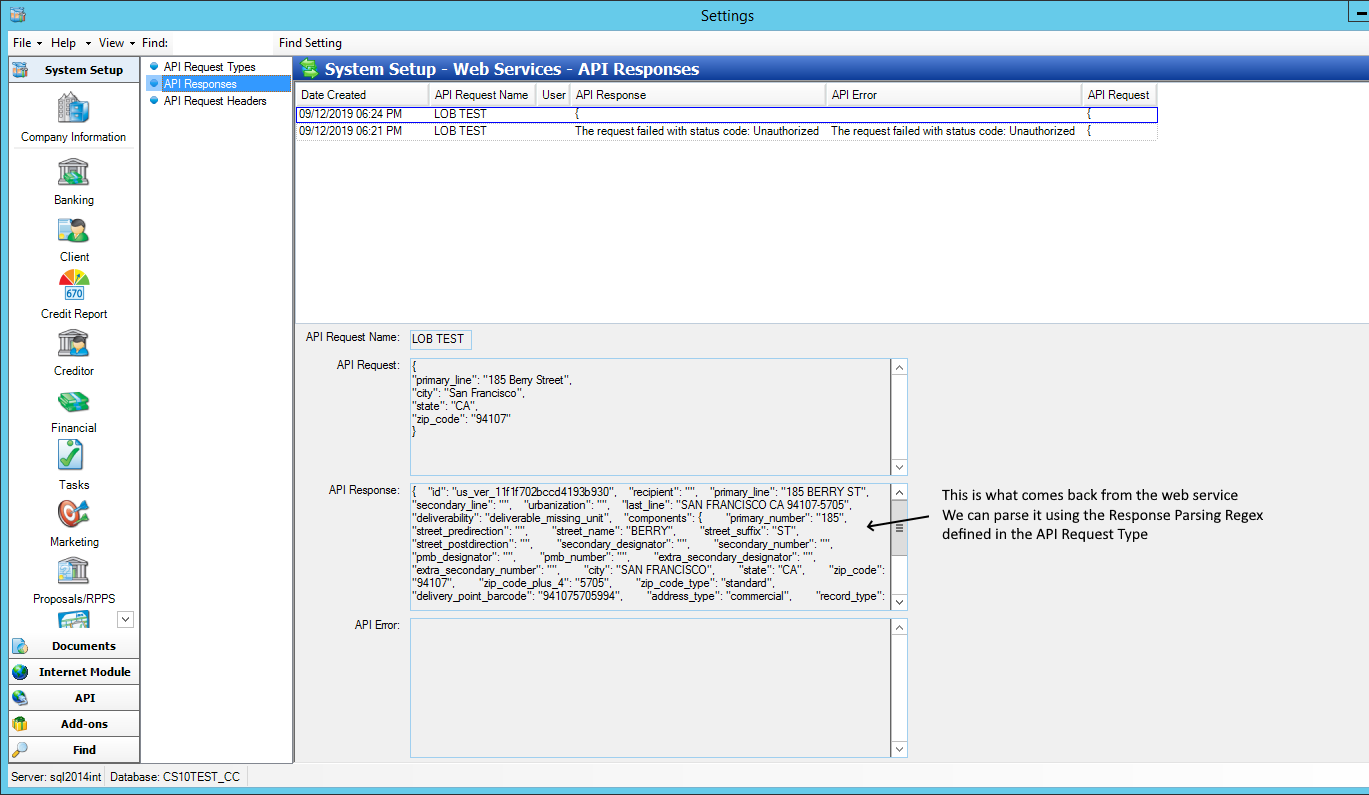
Every API Request and Response is logged in the database. You can review the log by going to the API Responses screen in Settings. This will allow you to troubleshoot configuration or data errors.
Let’s go back to Lob’s documentation and see what information it returns. Lob returns several fields (shown in the Example Response). Let’s say we want to return the “deliverability” field to the user.
Open the API Request and scroll down to the bottom. Type the following in the fields:
Post Script:
select 'Address validation result: {deliverability}' as OutputText
This script instructs CreditSoft to output text to the user after the API Request has completed. The text will be “Address validation result:” followed by a new bookmark {deliverability}. This bookmark does not exist in our Bookmark list, we want it to come from the API Response.
Let’s open one of the API Responses to see what data is coming back from Lob.
Navigate to Regex Storm’s website (http://regexstorm.net/tester) so we can define how and what we will parse from the responses.
Paste the API Response into the Input box on the Regex Tester.
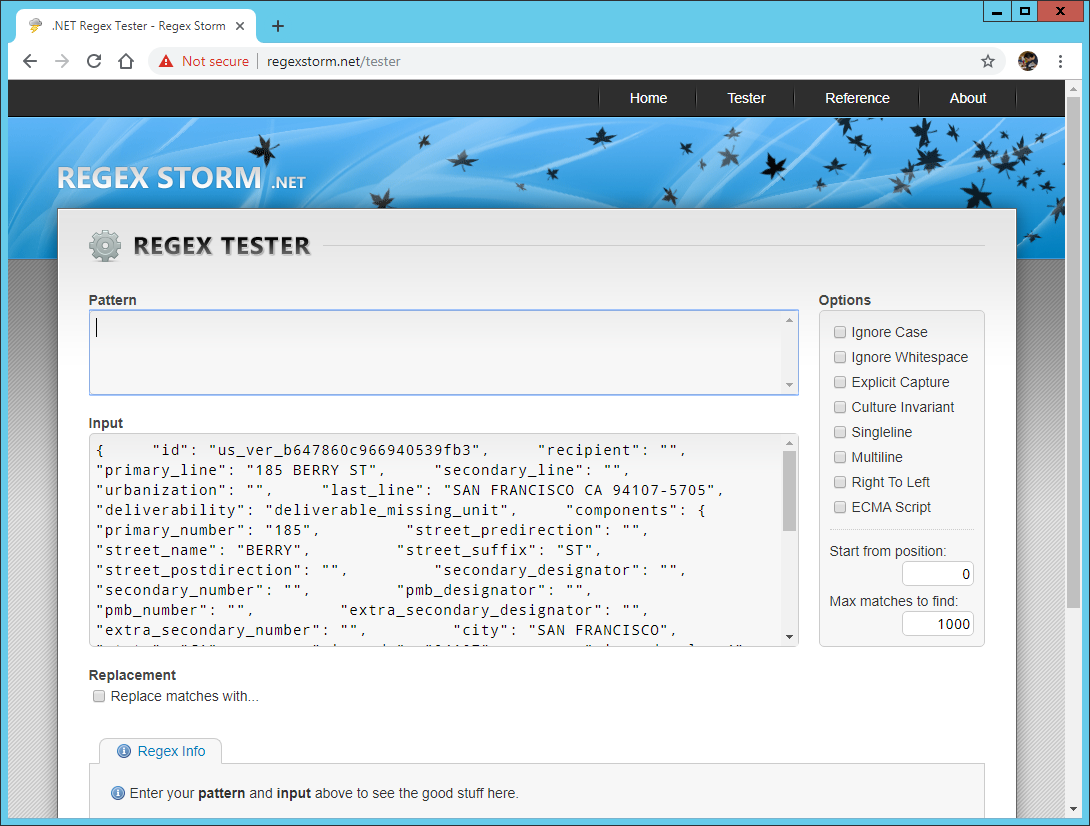
We will now figure out a pattern that will capture the information we want. In this case we want to capture the deliverability field.
Type the following in the Pattern box:
(?i)(?:"deliverability": "(?<deliverability>[a-zA-Z0-9_ ]+)",)
Notice that you immediately get a match highlighted in green.

Notice also that the Table tab at the bottom returns the value of the field (deliverable_missing_unit) in the ${deliverability} column.
This means that this Regex pattern successfully parses the API Response and returns the deliverability in a field called ${deliverability}. CreditSoft will allow us to use this field as a bookmark by using {deliverability} in our output text to the user.
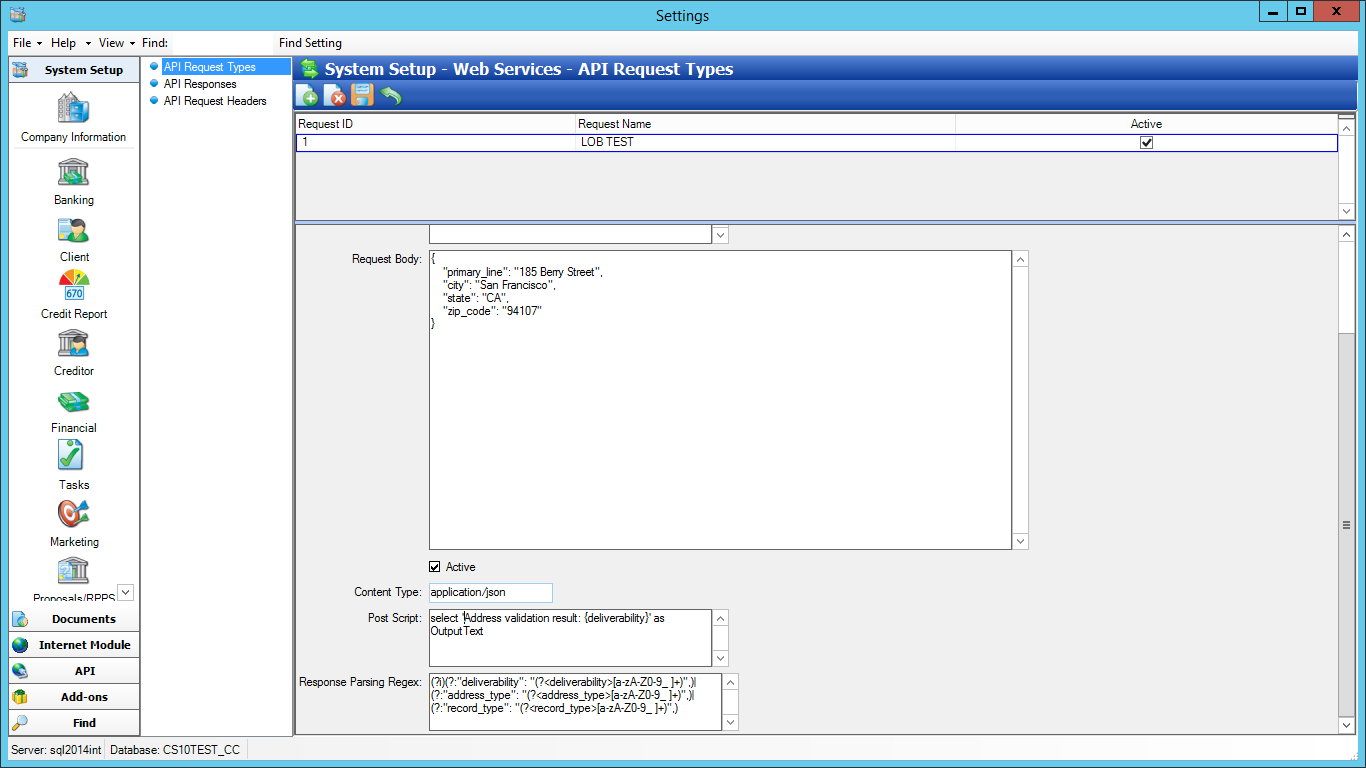
Let’s go back to the API Request in CreditSoft Settings.
Type the following in the Response Parsing Regex:
(?i)(?:"deliverability": "(?<deliverability>[a-zA-Z0-9_ ]+)",)|(?:"address_type": "(?<address_type>[a-zA-Z0-9_ ]+)",)|(?:"record_type": "(?<record_type>[a-zA-Z0-9_ ]+)",)
Notice I added a couple more fields to show you how you would parse additional fields from the API Response. But we will only display the deliverability field in the output text for now.
NOTE: Make sure you don’t add a line break at the end or in between. A Regex pattern will produce different results or no results at all if you add spaces, tabs or line breaks anywhere in the pattern string.
Save the API Request Type.
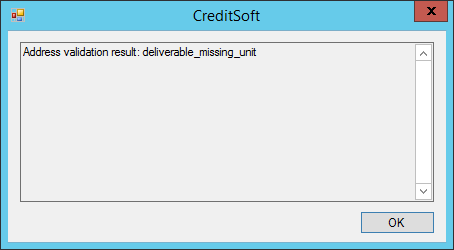
Go back to the client and click on the Actions menu again and call the API. You should get this box:
Remember we used Lob’s test address in our request (185 Berry Street). We will now modify the API Request so it sends the client’s address to validate it.
Open the API Request in Settings, and modify the Request Body to this:
{
"primary_line": "{CLIENTADDR1AND2}",
"city": "{CLIENTCITY}",
"state": "{CLIENTSTATE}",
"zip_code": "{CLIENTZIP}"
}
Notice we replaced the hardcoded example address with CreditSoft bookmarks. You can use the same bookmarks you use in your CreditSoft Documents. And remember you can also create your own bookmarks by going to the Bookmarks screen in Documents Settings.
Save the Request and close Settings.
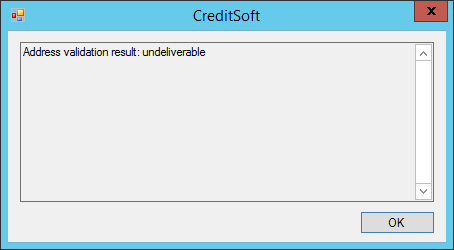
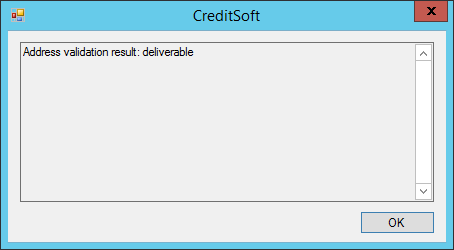
Let’s test the Request again this time passing the client’s address.
If the address is bad we will get this:
If the address is good we will get this:
CreditSoft also allows you to save one or more fields from the API Response to the database. Let’s save the deliverability field to a user defined field on the client screen.
Create a debtor user defined field:

Save the field and remember the User Defined ID (you will need it in the next step).
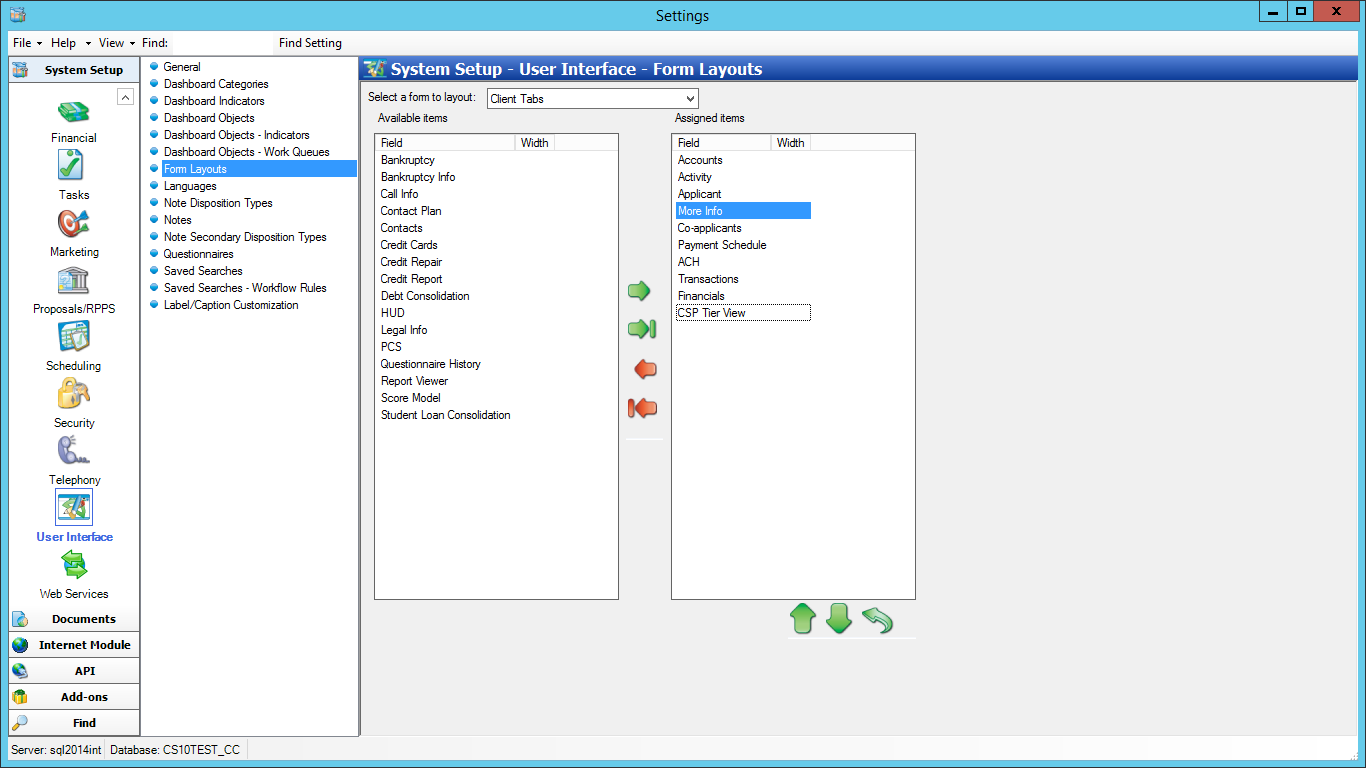
Make sure the More Info tab is visible on the Client screen tabs
Open the API Request and add the following to the Post Script:
;EXEC UpdateDebtorUDFs @ClientID ={ClientID}, @LeadClientID = null, @UserDefinedID = 2, @StringNewValue='{deliverability}', @UserID='{UserID}', @SkipAuditRecord = 0
Save and close Settings.
Call the API again from the Client screen, and then navigate to the More Info tab. You will see that the user defined field has stored and displays the value from the API Response.
